Monday, September 15, 2014

REST: Adding JSON support using jackson on weblogic 10.3.4

In my previous blog http://sanjeev-adf-webcenter.blogspot.in/2014/09/rest-service-on-weblogic-1034.html I showed how to create a RESTful service on weblogic 10.3.4

In this blog I am going to show how to provide JSON response from webservice using jackson apis.

jackson libraries are used to convert a JSON message into a java object and also java object to a JSON message.

We need to follow these steps
1. Configure weblogic for jackson libraries
2. Add jackson libraries to jdev project
3. Write pojos which needs to be exposed as JSON
4. Write service method and configure web.xml with Jersey servlet
5.  Deploy project on weblogic
6. Test

===================================================
1. Configure weblogic for jackson libraries

 Similarly as in previous blog we have added jersey libraries as a shared libraries in weblogic, this time we need to add jackson libraries. These libraries are available under $WL_HOME/common/deployable-libraries
 We need to add jackson-core-asl, jackson-jaxrs, jackson-mapper-asl libraries. For detail steps about how to add libraries see blog 'http://sanjeev-adf-webcenter.blogspot.in/2014/09/rest-service-on-weblogic-1034.html'


2. Add jackson libraries to jdev project

 For design time support of jackson libraries we need to add jackson libraries to our project.
 Follow these steps
a. Navigate to project properties > Library and classpath
b. Add Library 'JAX-RS Jersey Jacson (Bundle)' as shown below


For runtime support configure weblogic.xml so that code can refer to shared libraries of weblogic that we have installed in first step.


3. Write POJOs which needs to be exposed as JSON

As I said earlier jackson libraries can be used to convert java objects to JSON message and vice versa. We need to create POJO objects which needs to be represented in JSON. In this example I am creating employee and address pojos as shown below

Employee.java
package com.san.rest.entity;
import java.util.List;
public class Employee {
    private Long empId;
    private String name;
    private List addresses;   
    public Employee() {
        super();
    }

    public void setEmpId(Long empId) {
        this.empId = empId;
    }
    public Long getEmpId() {
        return empId;
    }
    public void setName(String name) {
        this.name = name;
    }
    public String getName() {
        return name;
    }
    public void setAddresses(List addresses) {
        this.addresses = addresses;
    }
    public List getAddresses() {
        return addresses;
    }
}

Address.java
package com.san.rest.entity;

public class Address {
    private Long addressId;
    private String addressType;
    private String line1;
    private String line2;
    private String city;
    private String state;
    private String country;
    private String zipCode;
    public Address() {
        super();
    }

    public void setAddressId(Long addressId) {
        this.addressId = addressId;
    }

    public Long getAddressId() {
        return addressId;
    }

    public void setAddressType(String addressType) {
        this.addressType = addressType;
    }

    public String getAddressType() {
        return addressType;
    }

    public void setLine1(String line1) {
        this.line1 = line1;
    }

    public String getLine1() {
        return line1;
    }

    public void setLine2(String line2) {
        this.line2 = line2;
    }

    public String getLine2() {
        return line2;
    }

    public void setCity(String city) {
        this.city = city;
    }

    public String getCity() {
        return city;
    }

    public void setState(String state) {
        this.state = state;
    }

    public String getState() {
        return state;
    }

    public void setCountry(String country) {
        this.country = country;
    }

    public String getCountry() {
        return country;
    }

    public void setZipCode(String zipCode) {
        this.zipCode = zipCode;
    }

    public String getZipCode() {
        return zipCode;
    }
}


NOTE: There is a one to many relationship in these two classes. One employee can have multiple addresses. We have included an instance variable addresses of type List in Employee class.

4. Write service method and configure web.xml with Jersey servlet

 Create new class EmployeeService in package com.san.rest.service
 NOTE: This package is already configured to have Jersey service classes in previous blog. It is done by creating entry in web.xml. See previous blog http://sanjeev-adf-webcenter.blogspot.in/2014/09/rest-service-on-weblogic-1034.html

EmployeeService.java
package com.san.rest.service;

import com.san.rest.entity.Address;
import com.san.rest.entity.Employee;
import java.io.IOException;
import java.io.StringWriter;
import java.util.ArrayList;
import java.util.List;
import javax.ws.rs.GET;
import javax.ws.rs.Path;
import javax.ws.rs.Produces;
import javax.ws.rs.core.MediaType;
import org.codehaus.jackson.JsonGenerationException;
import org.codehaus.jackson.map.JsonMappingException;
import org.codehaus.jackson.map.ObjectMapper;


@Path("employee")
public class EmployeeService {
    public EmployeeService() {
        super();
    }
   
    // To generate json
    @GET
    @Produces(MediaType.APPLICATION_JSON)
    public String getEmployeeDetails() {
       
                                                  
        Address a1 = new Address();
        a1.setAddressId(1L);
        a1.setAddressType("PERMANENT");
        a1.setLine1("Flat 1 ABC appartment");
        a1.setLine2("3rd Cross 1st Mian, MG Area");
        a1.setCity("Delhi");
        a1.setCountry("India");
        a1.setZipCode("00000");
       
        Address a2 = new Address();
        a2.setAddressId(2L);
        a2.setAddressType("CORRESPONDANCE");
        a2.setLine1("Flat 2 XYZ appartment");
        a2.setLine2("9th Cross 1st Mian, MG Area");
        a2.setCity("Bangalore");
        a2.setCountry("India");
        a2.setZipCode("99999");
       
        List addrList = new ArrayList();
        addrList.add(a1);
        addrList.add(a2);
       
        Employee e1 = new Employee();
        e1.setEmpId(1L);
        e1.setName("Sanjeev");
        e1.setAddresses(addrList);
       
        StringWriter output = new StringWriter();                                          
        ObjectMapper mapper = new ObjectMapper();
        try {
            mapper.writeValue(output, e1);
           
        } catch (JsonGenerationException e) {
            throw new RuntimeException("JsonGenerationException: " + e.getMessage());       
        } catch (JsonMappingException e) {
            throw new RuntimeException("JsonMappingException: " + e.getMessage());
        } catch (IOException e) {
            throw new RuntimeException("IOException: " + e.getMessage());
        }
       
        return output.toString();
    }

}


Important parts of this class are
a. Import of jackson classes: These classes are available from jackson libraries that we have added in project.
b. @Path("employee"): It means we need to add /employee in our url while calling this service
c. @GET: It means a get service
d. @Produces(MediaType.APPLICATION_JSON): It means response is of type JSON
e. Populate Employee/Address objects: As this is just a demo to show JSON response, I have created employee/address object inside service method itself but in general I would like to call a utility method or EJB session bean to provide me data about Employee/Address objects
f.  mapper.writeValue(output, e1): This method converts employee object e1 into its JSON representation.

Once again we can see our web.xml entry
    <servlet>
        <display-name>Rest Jersey Application</display-name>
        <servlet-name>RestJerseyApp</servlet-name>
        <servlet-class>com.sun.jersey.spi.container.servlet.ServletContainer</servlet-class>
        <init-param>
            <param-name>com.sun.jersey.config.property.packages</param-name>
            <param-value>com.san.rest.service</param-value>
        </init-param>
    </servlet>
    <servlet-mapping>
        <servlet-name>RestJerseyApp</servlet-name>
        <url-pattern>/rest/*</url-pattern>
    </servlet-mapping>


5.  Deploy project on weblogic
 Create a war profile and deploy it on weblogic server. Note down context root while creating war profile. Also explained in previous blog http://sanjeev-adf-webcenter.blogspot.in/2014/09/rest-service-on-weblogic-1034.html


6. Test


Disclaimer: Any views or opinions presented in this blog are solely those of the author and do not necessarily represent those of the company.

Wednesday, September 10, 2014

REST service on weblogic 10.3.4

In this blog we will be developing a simple REST service using jdev and deploying it on weblogic 10.3.4.


NOTE: Jdeveloper 12c has better support for REST service creation but in this blog I am using Jdev 11.1.2.4 (or any older version) because I have to deploy these services on weblogic 10.3.4

NOTE: We will be using Jersey reference implementation of jsr311 to create REST services

We will perform following steps
1. Configure weblogic 10.3.4 with Jersey libraries
2. Create a REST service
3. Configure web.xml for REST service resources
4. Configure weblogic.xml to refer shared Jersey libraries
5. Deploy project on weblogic server
6. Access REST service

==================================================================
1. Configure weblogic 10.3.4 with Jersey libraries:

We get Jersey libraries with weblogic but they are not by default installed so we need to install them ourself.
Jersey libraries are available at $WL_HOME/common/deployable-libraries
Install jersey-bundle-1.1.5.1.war, jsr311-api-1.1.1.war on weblogic server as a Shared libraries.
Follow these steps for installing libraries (one at a time)
a. Launch weblogic console http://<server>:<port>/console
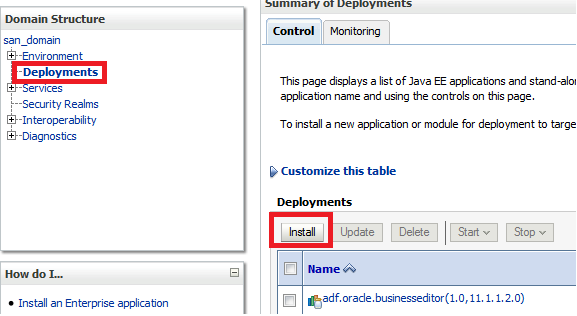
b. Navigate to Deployments
c. Click on Install
    
d. Select jersey-bundle-1.1.5.war
    
e. Select 'Install this deployment as library'
   
f. Select server on which you want to deploy this library. Note you can deploy rest service on same server. I am selecting 'Admin Server' so while deploying I can deploy REST service only on 'Admin server'. Admin server serves request from port 7001, which I need to use while accessing service.
  
f. Click Next Next and finish on rest of the pages.


Similarly install jsr311-api.war


2. Create a REST service

Next we need to create a simple REST service
Follow these steps to create REST service

a. Create an application/project.
    If you don't have an application/project already, create it.
    Create custom application/project.


b. Add Jersey library to project


c. Create a new java class to represent a resource
    REST stands for 'Representational State Transfer'. Actually we are transferring a resource between client and server. Every resource can be represented by structure (XML, HTML, TEXT, JSON) etc. We just want to transfer that representation of resource using REST service.

   Create a java class as shown below
   package com.san.rest.service;
import javax.ws.rs.GET;
import javax.ws.rs.Path;
import javax.ws.rs.Produces;
import javax.ws.rs.core.MediaType;


@Path("helloworld")
public class HelloWorld {

  // To generate plain text
  @GET
  @Produces(MediaType.TEXT_PLAIN)
  public String helloInPlainText() {
    return "Hello! How are you?";
  }

  // To generate xml
  @GET
  @Produces(MediaType.TEXT_XML)
  public String helloInXML() {
    return "<?xml version=\"1.0\"?>" + "<welcomeMsg> Hello! How are you?" + "</welcomeMsg>";
  }

  // To generate html
  @GET
  @Produces(MediaType.TEXT_HTML)
  public String helloInHTML() {
    return "<html> " + "<title>" + "Hello" + "</title>"
        + "<body><h1>" + "How are you?" + "</body></h1>" + "</html> ";
  }

}

3. Configure web.xml for REST service resources
  
a. Create web.xml (Java EE deployment descriptor) for your project.
     New > Search for 'Java EE Deployment Descriptor'
     Follow wizard
    

b. Add following entry in web.xml file
NOTE: There are other ways also to specify resource classes to jersey. For example using init parameter javax.ws.rs.Application, but I believe using com.sun.jersey.config.property.packages parameter is easiest way. 

NOTE: If you have service resource in multiple packages specify value as 
  <param-value>pkg1;pkg2;pkg3</param-value>

4. Configure weblogic.xml to refer shared Jersey libraries

   a. Create weblogic deployment descriptor (weblogic.xml) file
       New > Search for 'Weblogic Deployment Descriptor'


b. Add shared libraries in weblogic.xml file


5. Deploy project on weblogic server

a. Set context root for your project
 b. Create WAR deployment profile
   Project Properties > Deployment Profile > New (War deployment profile)
  

c. Deploy project on weblogic server
     Now deploy project on weblogic server as normal war file.
      You can create app server connection in resource palate and then right click on project and deploy
      OR alternatively you can deploy war file first and then deploy it using weblogic console

 
6. Access REST service 

You can access service as http://<server>:<port>/<context-root>/<url-pattern>/<path>

server: weblogic server host
port: weblogic server port
context-root: defined in step 5. myrestservice in our case
url-pattern: defined in web.xml. /rest in our case
path: defined as @Path annotation in service class. helloworld in our case


Disclaimer: Any views or opinions presented in this blog are solely those of the author and do not necessarily represent those of the company.

Friday, August 15, 2014

WebCenter: Content Presenter and Secured images

In WebCenter we use sitestudio and content presenter to show content from UCM. This blog could be useful for you if you find following behavior
1. Content presenter is not able to show images
2. You are able to see images sometime but not always
3. One browser shows images but other is not able to show
4. You are able to see images but your friend is not or vice versa.

Answer of all these problems lies in they way images are accessed using content presenter.

If we do F12 and see the url of image generated by content presenter, we found that its a direct URL to content server. For example

http://<server-name>:16200/cs/idcplg?IdcService=GET_FILE&dDocName=MY_Image&RevisionSelectionMethod=LatestReleased

This url is directly pointing to content server. Now content server can only give images if either of this is true
1. Image document is public. (Immediate solution but not feasible in for secured images)
2. You are explicitly logged into content server (may in another tab) and you have access to image document. (Cause which is responsible why we see images sometime)
3. You have SSO enabled so that your webcenter session can be used to access content server. (Best solution)

In above three cases you will be able to see image otherwise you would not.

Disclaimer: Any views or opinions presented in this blog are solely those of the author and do not necessarily represent those of the company.

Saturday, August 9, 2014

Jdeveloper and Disk space issue

Recently I was running out of disk space and then I thought of analyzing it. I found that one of my middleware home (which I use frequently) is much bigger than others. WinDirStat shows that there are few hprof files in my middleware-home/jdeveloper/jdev/bin directory, which are taking lots of space. (3GB each around).

hprof files gets generated whenever jvm crashes or jdev shows outofmemory error. All heap information is dumped in hprof file and its size is generally same as your jdev memory size. That is why they are so huge.

These files can be used to analyze jvm crash but most of the time we are not interested in that untill its happening too frequently. We can delete them safely, which should give us lots of disk space back.


Another thing you may want to change it system directory location from C drive to some other location. For that you can set JDEV_USER_DIR environment variable. 

Disclaimer: Any views or opinions presented in this blog are solely those of the author and do not necessarily represent those of the company.

Friday, August 8, 2014

ADF Mobile: Issues faced while migrating from 11.1.2.4 to 12.1.3.0

Till 11.1.2.4 it was ADF Mobile and from 12.1.3.0 it is Mobile Application Framework (MAF). In this blog I am just writing few issues that I have faced while migrating one of my ADF mobile (11.1.2.4) project to MAF.

====================================================================
Issue 1:
Error: Unable to copy to output directory, D:\<file-path>\ApplicationController\src\META-INF\adfmf-skins.xml not found    ApplicationController.jpr    D:\<file-path>\ApplicationController    ApplicationController.jpr


Error: Unable to copy to output directory, D:\<file-path>\ViewController\src\META-INF\adfmf-feature.xml not found    ViewController.jpr    D:\<file-path>\ViewController    ViewController.jpr

Solution: https://community.oracle.com/thread/3579575
a. Remove .data directory
b. Do a clean build as there is no adfmf-skins.xml. Its changed to maf-skins.xml

====================================================================

Issue 2: Skin (css file) developed in 11.1.2.4 is not picked
Solution: Use version Id with 12.1.3 to define your skins and also to refer oracle provided base skins, which you are extending.
See bottom of this blog to set correct entries of maf-skin.xml and maf-config.xml

====================================================================

Issue 3: Error (Line 22, Column 48): Attribute allowDeviceAccess not defined on element adfmf:featureReference
Solution: remove allowDeviceAccess attribute from maf-application.xml

====================================================================

Issue 4:
Unable to load resource JSON file
/data/data/com.company.AbsenceManagemetn/files/baseProfiles/profile.json
Empty Response
Error: a profile is required to set up the base page

Solution: Problem with skin configuration in maf-skins.xml file. Start using skin versioning
See bottom of this blog to set correct entries of maf-skin.xml and maf-config.xml


====================================================================

Issue 5: KXmlUtil.loadFromXml Unexpected element - HTML Expected schema
Solution: Redeploy apk and use that.

====================================================================

Issue 6: The custom authentication page does not have credentials field.
Solution: This issue only occurs if we have created custom login page in 11.1.2.4 by copying adf-mobile-provided-login-pages-and-js. We need to again copy new login page and customize that as per our need. 


=========================================================
Correct way of extending skins in MAF

Disclaimer: Any views or opinions presented in this blog are solely those of the author and do not necessarily represent those of the company.


Saturday, July 19, 2014

ADF Good (Best) Practice: Register bean in backingbeans cope

This blog is to highlight why we should register our beans in backing bean scope.

ADF supports following scopes: backingbean, request, view, pageFlow, session and application.

As a good practice we should register our beans in backingbean scope.

1. Why we should not use view, pageFlow, session, application: System needs to serialize any information in these scopes during fail over and also when user times out. Generally we bind UI components with a bean and these components are not serializable so if bean is registered in above scopes it will not get serialized and serialization will fail.


2. Why we should not use requestScope: Serialization is not a problem if bean is registered in request scope because system does not serialize any object that is present in request scope. That make sense also because anything that is in request scope should be lost in next request so what is the point to serialize that information. BUT still we should not register our beans in request scope. That is because if we use a task-flow on a page twice and task-flow has a request-scope bean, both instances of task-flow will start sharing same instance of bean. It can create a lot of confusion.


3. Why should we use backing-bean Scope: Backing bean scope is almost same a request scope in terms of life cyle so system need not to serialize any such bean. Also we get advantage that system create two instances of bean if we use task-flow twice on a page.


4. Is it good enough: Now question is "Can we meet all requirements by storing beans in backing-bean scope?". I would say most of the time YES, you can. Mostly we need to put certain INFORMATION on higher scopes (like pageFlow, session, application) and to store that we don't need to put bean in that scope. We can directly put INFORMATION (or value) in scope. For example we have a 4 page task-flow, which has employee search on first page and user can select an employee on first page. After selecting employee user can navigate to page 2, 3, 4. On page 4 we need to know selected employee record.
To achieve this one developer do following
   a. Bind employee table of first page on a page-flow bean
   b. Bind table with the bean.
   c. On page 4, get page-flow bean and then get table and then try to get selected employee row.

Other developer can follow this approach
   a. Bind employee table of first page on backingbean-scoped bean
   b. Bind table with that bean
   c. While navigating to page-2 get selected row from employee table and store its (employee-id or any other needed information) in page-flow scope. If you need complete employee information you can create employee-pojo (object) and set its attribute and then store employee object in page-flow
   d. Access employee information from page-flow scope.

[IF you are using bindings and on selection you have selection listener which makes employee row current, you can directly create binding of same vo on page-4. That could be even better]

We see mostly we need to information on different pages, so its better to store those information on needed scope rather than bean.


5. If you really want to store bean in higher scopes: If you really need bean in higher scopes atleast use ComponentReference.

http://myfaces.apache.org/trinidad/trinidad-api/apidocs/org/apache/myfaces/trinidad/util/ComponentReference.html


Disclaimer: Any views or opinions presented in this blog are solely those of the author and do not necessarily represent those of the company.

Wednesday, July 9, 2014

ADF: Programatic user authentication instead of j_security_check (Password retrieval )

When we create ADF project and enable security, system creates a login page for us. Which has following code.


<form method="POST" action="j_security_check">
      <table cellspacing="2" cellpadding="3" border="1">
        <tr>          <th>Username:</th>
          <td>            <input type="text" name="j_username"/>          </td>
        </tr>
        
        <tr>          <th>Password:</th>
          <td>            <input type="password" name="j_password"/>          </td>
        </tr>
      </table>
      <p>
        <input type="submit" name="submit" value="Submit"/>
      </p>
    </form>

When user clicks on submit button, login form get submitted. It calls j_security_check, which is provided by framework. It validates username/password against ldap configured in weblogic.

We do not get any point to know what was username/password. At times we may want to derive  username/password combination. A usecase could be integration with third party. Imagine you want to integrate with third party system which takes username/password. For example sharepoint webservices. I tried checking OPSS apis but seems like there is no way to retrieve password using them. OPSS apis not retrieving password makes sense also.

To solve our problem I can think of a solution to capture user password while he is trying to login and if authentication is fine store user password in sessionscope. Use it later when calling third party system.

I personally think there might be better ways to do it but I could not find any solution. In this blog I am just describing a way to authenticate user programmatically instead of j_security_check.

Here are the steps:

1. Change login.html to login.jspx: Instead of using normal login.html page lets create a jspx page for login.
Put following form entry in it.

<af:panelFormLayout id="pfl2" styleClass="form_layout">
                        <f:facet name="footer"/>
                        <af:inputText label="#{portalBundle.USER_NAME}:" id="it1"
                                      value="#{viewScope.username}"
                                      required="true" maximumLength="50"
                                      partialTriggers="cb1"/>
                        <af:inputText label="#{portalBundle.PASSWORD}:" id="it2"
                                      value="#{viewScope.password}"
                                      secret="true" required="true"
                                      maximumLength="50" partialTriggers="cb1"
                                      shortDesc="Enter Password"/>
                        <af:commandButton id="cb1"
                                          action="#{backingBeanScope.LoginPageBean.doLogin}"
                                          text="#{portalBundle.LOGIN}"
                                          styleClass="login"
                                          partialSubmit="true"/>
                      </af:panelFormLayout>


In above code commandButton-cb1 does a partial submit and calls doLogin method of LoginPageBean. Username and password are stored in viewscope.

LoginPageBean code should look like


import com.kbace.hrc.common.util.diagnostic.DiagnosticUtil;


import java.io.IOException;

import java.util.Map;

import javax.faces.application.FacesMessage;
import javax.faces.application.ViewHandler;
import javax.faces.component.UIViewRoot;
import javax.faces.context.FacesContext;

import javax.security.auth.Subject;
import javax.security.auth.login.FailedLoginException;
import javax.security.auth.login.LoginException;

import javax.servlet.RequestDispatcher;
import javax.servlet.ServletException;
import javax.servlet.http.HttpServletRequest;
import javax.servlet.http.HttpServletResponse;

import oracle.adf.share.ADFContext;
import oracle.adf.share.logging.ADFLogger;
import oracle.adf.share.security.SecurityContext;
import oracle.adf.view.rich.component.rich.RichPopup;
import oracle.adf.view.rich.component.rich.output.RichOutputText;

import weblogic.security.URLCallbackHandler;
import weblogic.security.services.Authentication;

import weblogic.servlet.security.ServletAuthentication;


public class LoginPageBean {
    private static ADFLogger _logger =
        ADFLogger.createADFLogger(LoginPageBean.class);
    private RichOutputText pageInit;
    private RichPopup loginErrorPopup;
    private RichPopup userRoleErrorPopup;

    public LoginPageBean() {
    }
    private String _username, _password;


       public String doLogin() {
        String methodName = Thread.currentThread().getStackTrace()[1].getMethodName();
        _username = (String)ADFUtil.evaluateEL("#{viewScope.username}");
        _password = (String)ADFUtil.evaluateEL("#{viewScope.password}");
        String un = _username;
        byte[] pw = _password.getBytes();
        FacesContext ctx = FacesContext.getCurrentInstance();
        HttpServletRequest request = (HttpServletRequest)ctx.getExternalContext().getRequest();
        String loginStatus = "login_failed";
        try {
            Subject subject =   Authentication.login(new URLCallbackHandler(un, pw));
            weblogic.servlet.security.ServletAuthentication.runAs(subject,     request);
            ServletAuthentication.generateNewSessionID(request);

            loginStatus = "success";
             String redirecturl = "/adfAuthentication?success_url=/index.html";
            Map session = (Map)ADFUtil.evaluateEL("#{sessionScope}");
            session.put("userPassword", _password);
            session.put("username", _username);

                try {
                   FacesContext.getCurrentInstance().getExternalContext().redirect(FacesContext.getCurrentInstance().getExternalContext().getRequestContextPath() + redirecturl);
               
                } catch (Exception nm) {
                    nm.printStackTrace();
                }
          
        } catch (FailedLoginException fle) {
            ADFUtil.getRequestFlowScope().put("pShowAuthError", "Y");
            RichPopup.PopupHints pph=new RichPopup.PopupHints();
            this.getLoginErrorPopup().show(pph);
            ADFUtil.setEL("#{viewScope.password}", null);

        } catch (LoginException le) {
            FacesMessage msg =
                new FacesMessage(FacesMessage.SEVERITY_ERROR, "Error Logging In",
                                 "Error Logging In");
            ctx.addMessage(null, msg);

        }
        return null;
    }


}


Above method doLogin tries following things
1. Get username/password from viewscope
2. Authenticate username/password using weblogic security apis. 
3. If valid username/password then start a new session.
4. Store username/password in sessionscope
5. Redirect to index.html if successful login.
6. Show error popup if authentication fails.
   

Also we need to add following libraries in our project


a.       com.bea.core.weblogic.security.auth_1.1.0.0.jar: $MW_HOME\modules
b.      com.bea.core.weblogic.security.identity_1.1.2.1.jar: $MW_HOME\modules
c.       ws.api.jar: $MW_HOME\wlserver_10.3\server\lib


I am not very sure if its best way of doing it. I would definitely love to know better ways of doing this but for time being I just know this way.


Disclaimer: Any views or opinions presented in this blog are solely those of the author and do not necessarily represent those of the company.